Painting A Piano
Have you ever considered painting that old, dinged up piano sitting in your living room? I grew up playing the piano and always wanted one when I got older, but buy a new piano was definitely out of our budget. We bought a second-hand piano for only $150, but it definitely did not add to the aesthetics of our home. It was scratched and dark brown and an overall eyesore. With just a few coats of paint though, it’s not one of my favorite things in our house! It was also significantly easier to paint than I thought it would be. Here's how I did it. 
Painting A Piano
Before I tell you how I did it, I know there are some of you who might be dying over the fact that I put paint all over a piano. I haven’t noticed any difference in the sound quality of my piano, and honestly, it was only worth $150 anyway. The one thing I did read in though was that you shouldn’t paint the back panel - that is the soundboard and painting that will affect the sound of your piano.
Alright, now that’s out of the way, here’s how I painted my piano.
1. Get your piano somewhere where you can sand and paint without a problem. This only took me one day, so if it’s nice weather and it’s easy to get your piano outside that might be the best option. I painted mine in the unfinished section of our basement.
2. Remove anything that can be easily taken off. In this case, I took off the lid of the piano, the knobs for the drawer, and the music stand. This will make it easier to sand and paint.
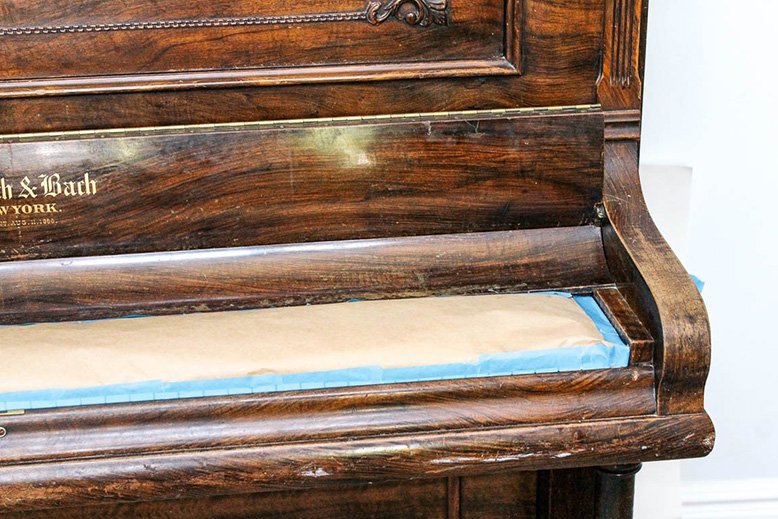
3. Repair anything that needs to be fixed on your piano before you get started. There was a major gouge in the side of the piano which we filled with wood filler and then sanded smooth.
 via
via 4. Tape everything off! Be especially careful around the keys of your piano. You’ll be sanding and the last thing you want is dust all in your piano. You’ll also want to tape off the pedals.
5. Start sanding. I used an electric hand sander for the larger parts of the piano and a sanding block for anywhere the sander couldn’t get like corners and rounded piano legs. Your goal here is to smooth out any bumps or scratches and to get as much of the glossy varnish off as possible. Your paint job will last longer and look better if you don’t skimp on this step. After you've finished, make sure you wipe down all the dust and clean the piano in preparation for the paint.
6. Prime your piano. I chose a dark blue paint color for my piano and just happened to have a grey primer at our house that worked perfectly. If you’re going to be painting your piano a dark color, a grey primer is a great option. If you’re wanting to go for a lighter, brighter color stick with white. I only needed one coat of primer.
7. Sand again. This time you're going to go over your primer and lightly sand out any bumps, bubbles, or drips in the paint. This is an important step if you want a smooth finish on your piano.
8. After you've lightly sanded and wiped down the piano, start painting! I wanted as smooth of a surface as possible so I used a high-density foam roller and a brush for the smaller areas I couldn’t get to with the roller. Let each coat completely dry before starting your next one. I only needed two coats, but if you are going from a dark piano to a lighter color, you may need to do more.
We also decided to stain the lid of the piano rather than paint it the same color as everything else. It took us a little longer to finish just because we added an extra element. Still, all in all, it only took us a day to finish the piano. Most of that time was time for the paint to dry.
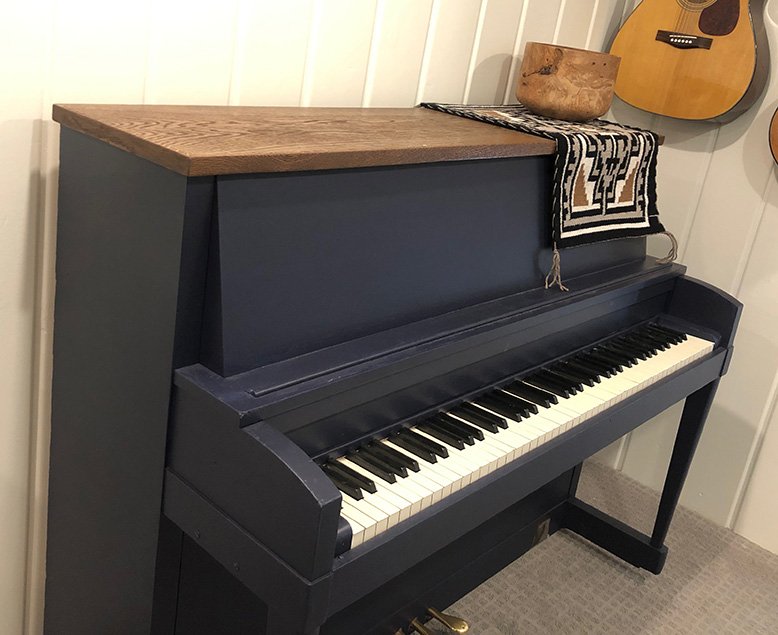
The finished product!
9. After it’s completely dry - I let mine sit overnight just in case - you can remove the tape and reassemble everything. Enjoy your new piano!
I’ll be honest, it was a pain to paint a piano with my toddler running around and so interested in what I was doing, but that was the hardest part! It felt overwhelming to get started, but once I did the process went quickly and smoothly, and I’m thrilled with the end result.
Do you have a piano you might paint? What color would you choose?
Popular Posts
Follow Us Online
Recent Posts
Archive
- ► 2024 (8)
- ► 2023 (15)
- ► 2022 (28)
- ► 2021 (13)
- ► 2020 (6)
- ▼ 2019 (110)
- ► November (1)
- ► October (4)
- ► September (7)
- ► August (11)
- ► July (8)
- ► June (9)
- ► May (16)
- ► April (15)
- ▼ March (17)
-
 Flower Pot Ideas
-
Cheese Plate Ideas
-
DIY Living Room Decor
-
Garden Ideas
-
B-Ball Watching Party Ideas
-
Spring Cleaning Tips
-
Apartment Decor
-
Velvet
-
DIY Bathroom Ideas
-
Green Inspiration
-
The Best Banana Bread Trick
-
Painted Wood Paneling
-
Painting A Piano
-
3 Reasons Why Everyone Should Try A Weighted Blanket
-
Laundry Room Colors
-
St. Patrick's Day Crafts
-
Beautiful Kitchens
- ► February (20)
- ► January (2)
- ► 2018 (245)
- ► 2017 (304)
- ► 2016 (4)
- ► 2015 (2)
